How to Make Crepes – Step-by-Step Thin Batter Guide
Mastering the technique for delicate, paper-thin French crepes requires precise hydration and temperature control. The process transforms simple pantry staples—flour, eggs, milk, and butter—into a versatile foundation for both sweet desserts and savory entrées. Unlike their thicker American pancake cousins, crepes demand a fluid batter and swift wrist action to achieve their characteristic lacy, golden surface.
The fundamental chemistry relies on proper protein structure and resting time. All-purpose flour provides the necessary gluten network without creating rubberiness, while a combination of whole milk and water yields the optimal consistency for spreading thinly across a hot pan. Understanding these material interactions separates pallid, torn crepes from those with the textbook tender chew and buttery aroma.
This guide examines the essential preparation methods, equipment requirements, and troubleshooting techniques required for consistent results. From blender versus hand-mixing debates to the precise moment a crepe releases from the pan, every variable affects the final texture.
How Do You Make Crepe Batter?
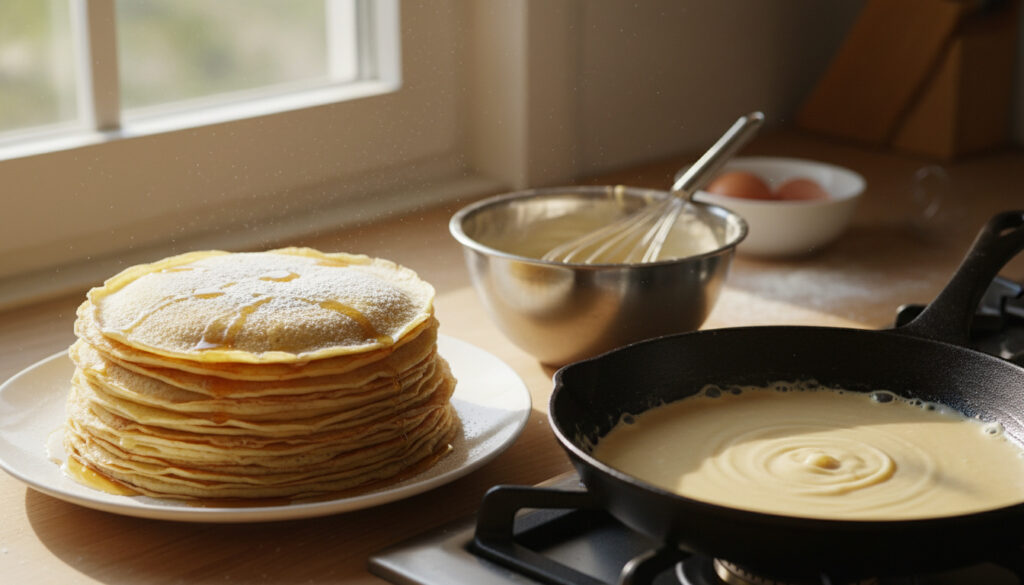
The foundation of any successful crepe begins with four essential components: all-purpose flour, eggs, whole milk, and butter. According to Preppy Kitchen, a reliable base recipe combines one cup of flour with three large eggs, three-quarters cup whole milk, half cup water, and one tablespoon melted butter, plus vanilla and salt for flavor equilibrium.
Flour, eggs, milk, butter, water
Blend 30 seconds, refrigerate 1 hour minimum
10-inch nonstick pan to medium-low
1 minute per side until golden
The protein structure depends heavily on egg incorporation. Sally’s Baking Addiction notes that eggs bind ingredients while providing structural integrity, preventing the delicate sheets from falling apart during flipping. Whole milk contributes fat content necessary for tender texture, while the addition of water prevents the heavy, rubbery result that occurs when using dairy alone.
What Is the Best Mixing Method?
Culinary professionals debate between mechanical and manual incorporation. The blender method processes all ingredients for 15 to 30 seconds, creating perfectly smooth emulsions by cutting flour proteins instantly into wet ingredients. Alternatively, the whisk technique requires blending milk and eggs first, then gradually introducing flour to form a smooth paste before thinning with remaining liquid—a approach that prevents gluten overdevelopment.
- Rest batter for at least one hour to allow flour hydration and gluten relaxation
- Use whole milk rather than skim for richer mouthfeel and proper browning
- Maintain a 2:1 liquid to flour ratio by weight for optimal spreadability
- Blend for 30 seconds maximum to prevent aeration that creates bubbles
- Resting overnight produces superior texture compared to minimum times
- Butter creates both flavor and the nonstick surface necessary for clean release
| Parameter | Specification |
|---|---|
| Prep Time | 10 minutes plus resting |
| Resting Period | 1 hour minimum (4 hours optimal) |
| Cook Time | 20 minutes total |
| Yield | 12 crepes |
| Calories per Crepe | Approximately 100 |
| Difficulty Level | Beginner |
| Primary Equipment | 8-10 inch nonstick skillet |
| Batter Shelf Life | Up to 2 days refrigerated |
What Pan Is Best for Making Crepes and How Thin Should They Be?
Equipment selection significantly impacts the final product. An 8 to 10 inch nonstick skillet or dedicated crepe pan provides the ideal surface area for home cooking, allowing sufficient room to swirl batter into a 10-inch diameter circle. Unlike technical communication systems such as What Does SOS Mean – Morse Code Distress Signal Explained, crepe cooking relies entirely on visual and tactile feedback rather than standardized signals.
Do You Need a Special Pan for Crepes?
While dedicated crepe pans exist with low angled sides for easy access, standard nonstick skillets perform adequately. The critical factor remains surface condition—any scratches or worn coating will cause sticking regardless of butter quantity. Cast iron delivers excellent heat retention but requires seasoning and more fat to prevent adhesion, making nonstick aluminum or steel the practical choice for beginners.
How Thin Should Crepes Be?
Proper thickness measures approximately 1 to 2 millimeters, allowing light transmission without tearing. The batter should spread to the pan edges immediately upon pouring, creating a translucent layer that cooks through in roughly one minute. Thicker applications result in gummy centers, while excessive thinness produces dry, cracker-like edges prone to cracking when folded.
Medium or medium-low heat prevents the butter from burning while allowing the batter to set slowly. High temperatures cause immediate sticking and uneven browning, whereas insufficient heat produces pale, rubbery textures. Test the first crepe as a calibration batch, adjusting the flame until golden spots appear at 60 seconds.
How Do You Cook and Flip Crepes Without Sticking?
The cooking phase demands rapid, continuous motion. After brushing the heated surface with melted butter, pour one-quarter cup batter directly into the center. Immediately tilt and rotate the pan in a circular pattern, allowing centrifugal force to draw the liquid outward to the rim before it begins setting.
How Long Do You Cook Crepes?
I Heart Naptime recommends approximately one minute per side until the surface displays light golden-brown spotting. The edges will visibly dry and lift slightly from the pan when ready for flipping. Cooking duration varies by stove output and pan conductivity, requiring observation rather than strict timing.
Why Do My Crepes Stick to the Pan?
Adhesion typically stems from inadequate fat application or excessive heat. The butter layer must coat the entire cooking surface before each pour, creating a barrier between proteins and the pan. Nonstick degradation represents another common culprit—once the coating deteriorates, no amount of fat prevents sticking, necessitating pan replacement.
What Are the Best Fillings for Crepes?
The neutral base accommodates diverse flavor profiles through minor batter adjustments. The Flavor Bender distinguishes between applications by sugar content: sweet versions incorporate 2 to 3 tablespoons sugar, while savory preparations use merely 2 teaspoons to complement cheese, ham, or vegetable fillings without cloying sweetness.
Traditional fillings include fresh berries, banana slices, chocolate-hazelnut spread, and maple syrup. These combinations require the higher sugar batter to balance acidic fruit flavors and create dessert-appropriate profiles.
Reduced sugar prevents interference with umami-rich ingredients like gruyère, sautéed mushrooms, or smoked salmon. The neutral canvas allows herbs such as chives or parsley to remain prominent without competing against sweetness.
Can You Make Crepes Ahead of Time?
Advance preparation reduces same-day stress for entertaining. The batter tolerates refrigeration for up to 48 hours, often improving as hydration continues. Cooked crepes stack without sticking when cooled, allowing assembly hours before service.
- Mix Ingredients (5 minutes): Combine dry and wet components via blender or whisk until smooth
- Rest Batter (1-4 hours): Refrigerate covered to hydrate flour and relax gluten
- Heat Pan (2-3 minutes): Bring nonstick surface to medium-low temperature
- Pour and Swirl (30 seconds): Distribute quarter-cup portions immediately to edges
- First Side (60 seconds): Cook until edges dry and surface appears matte
- Flip and Finish (60 seconds): Turn gently, cooking until golden spots emerge
- Stack or Store: Layer between parchment for later use or serve immediately
Why Do Crepes Stick? Established Causes vs. Variables
Understanding failure modes requires distinguishing between confirmed mechanical causes and situational variables that resist universal solutions.
Established Factors
- Nonstick surface degradation causes irreversible sticking
- Insufficient butter application eliminates protective barrier
- Excessive heat carbonizes proteins before release
- Undissolved flour lumps create adhesion points
Uncertain Variables
- Optimal exact temperature varies by stove BTU output and pan material
- Specific seconds until first release depend on ambient humidity
- Altitude effects on batter viscosity require untested adjustments
What’s the Difference Between Crepes and Pancakes?
French culinary tradition dating to the 13th century distinguishes these items through batter viscosity and cooking method. Pancakes utilize thick, leavened batt—often containing baking powder—that creates fluffy, cake-like interiors through trapped air expansion. Crepes employ thin, unleavened liquid that spreads across the entire pan surface, producing flat, flexible sheets.
The textural divergence extends to serving styles. Pancakes stack vertically with butter soaking between layers, while crepes fold or roll around fillings without interstitial space. This structural difference makes crepes suitable for utensil-free hand eating when wrapped, whereas pancakes require forks and knives.
Sources and Testing Standards
Recipe development relies on standardized testing methodologies from professional culinary sources. King Arthur Baking provides laboratory-tested formulas accounting for protein percentages in various flour brands, ensuring consistent hydration ratios across different product lines.
“Resting the batter allows flour to fully hydrate and helps achieve smoother texture and better spread.”
— The Flavor Bender, Classic French Crepes Methodology
“The blender cuts flour perfectly into wet ingredients, eliminating lumps that plague hand-mixed batt.”
— Sally’s Baking Addiction, Mechanical Mixing Analysis
What Should You Cook Next?
Once comfortable with the basic technique, experiment with buckwheat flour for savory galettes or incorporate citrus zest into sweet batters for aromatic variation. For additional technique refinement, consult How to Make Crepes – Easy Recipe and Pro Tips for visual demonstrations of the swirling motion essential for even thickness.
Frequently Asked Questions
Can I freeze cooked crepes for later use?
Research confirms batter stores refrigerated for 48 hours, though specific freezing protocols for cooked crepes remain unverified in available sources.
Why does my batter form lumps when whisking?
Adding flour directly to liquid causes clumping. Instead, whisk eggs with milk first, then incorporate flour gradually to form a smooth paste before thinning.
Is it possible to make crepes without eggs?
Available research does not include tested vegan substitutions or egg-free binding alternatives for this specific application.
Why do my crepes tear when flipping?
Insufficient cooking time on the first side prevents structural set. Wait until edges visibly dry and lift from the pan before attempting to turn.
Can I use bread flour instead of all-purpose?
Higher protein bread flour creates excessive gluten development, resulting in rubbery, tough crepes that resist the tender texture characteristic of proper technique.
How do I prevent bubbles in my batter?
Extended blending introduces air. Limit mechanical mixing to 30 seconds, or let batter rest additional time to allow bubbles to dissipate before cooking.
More related posts
 The Night Manager Season 1 – Episode Guide, Cast and Where to Watch
 Back to Wall Toilet Guide: Pros, Cons, Installation & Tips
 Star Wars Skeleton Crew: Worth Watching? Episodes & Age Rating
 How Many Km is a Half Marathon? 21.1 km Guide + Times
 M&S Foodhall – Find Stores Near You and Shop Online
 What Is Fucidin Cream Used For? Impetigo & Eczema Guide
 kg to lbs to stone: Quick Conversion Guide & NHS Charts
 Car Valet Near Me: Costs, Benefits, and What’s Included